Epoxy Putty: First experiments
Inspired initially by this excellent figure of an Ood (out of Doctor Who) and its co-creators answers to my questions about it, and spurred on by this thread in Flickr’s Miniature Sculpting forum, I recently purchased some epoxy putty for modelling.
I first got enthused reading about Magic Sculp, but eventually established that even the cheapest UK supplier I could find, Sylmasta, charges around three times as much as it goes for in the US (and about twice as much as I pay for the same weight of polymer clay) – but as it happens, they also sell their own brand of epoxy modelling putties, Sylmasta A+B (white, or at least very light grey) and Super Carve (available in a range of colours), which also come highly recommended by random people off the internet. Milliput is the only epoxy putty I’d been exposed to in person before, and it’s very easy to get hold of – but it’s relatively expensive, and not very highly regarded by most of the sculptors I’ve seen expressing opinions.
Epoxy putty of any variety has several advantages over the likes of Fimo and Sculpey – it doesn’t require baking, it adheres firmly to almost any surface and it ends up being far stronger and far harder. On the other hand, it has a faintly unpleasant petrochemical smell, requires a bit more work and tends to work out more expensive (at least in Europe).
The putty starts out in two parts, a resin and a hardener, and you need to thoroughly mix and knead them before you start. This is probably best done with gloves really (at least according to some sources) but I’ve been doing it bare-handed so far without any obvious ill effects. As soon as it’s mixed, it starts hardening – on average, you’ve only got a couple of hours to work with it before it’s really hard, and in the first hour or so it goes from being distinctly on the floppy side to being really very firm; depending on what you’re making, the firmness might be very desirable or a big pain.
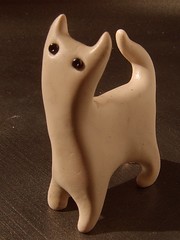
 Me being me, the first thing I made was a cat. This was fun, and went fairly smoothly, but it brought out what to me is the most striking difference between epoxy putty (at least, A+B) and the polymer clays I’m used to: It’s near-total lack of elasticity. It’s one of those things you don’t think much about until it’s gone, but it turns out to make a big difference. I started to extrude limbs in the way I usually do when I make cats, and found I kept needing to smooth over the cracks I was making as I went.
One advantage of this is that things stay where you put them much more readily than they do with polymer clay, which sometimes springs back into place a little. Also, the putty is very quick to bear the impression of anything that presses against it, which is potentially very useful even if it isn’t always desirable. It’s not sticky to the touch, despite its excellent adhesive qualities when left in place – but it did prove sticky enough to easily attach little beads for eyes, which is handy given the limited range of colours I currently have available.
Once it’s cured it has a pleasing weight to it, and it’s really good and hard; it feels altogether far more substantial than polymer clay, and it’s easy to beliebe what I’ve read about its vastly greaters strength.
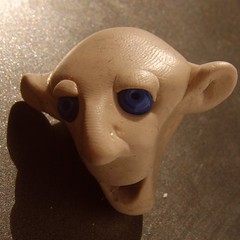
 After the cat I still had lots of putty left over which I needed to use before it set hard, so I set to work making a human face. Humanoid, anyway… the squishiness of the material tripped me up a bit here – it is putty, and it feels and works like it. The head came out okay in the end, but it’s sort of… meltier than I’d really intended.
I regretted not leaving the putty to firm up for a while before trying to do something like that, but then when I did leave a bit more to harden, I ended up going away for too long and it was almost impossible to work! We live and learn though, and I always expect to make mistakes when I try out a new medium.
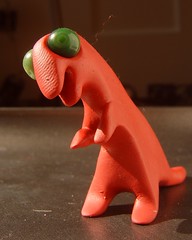
 I made the same mistake again when I tried out the bright read Super Carve I bought – it’s noticeably a good deal softer than the A+B, and the dinosaur I made kept sagging gently to one side or the other for a long time after I first made it, as if it was drunk and sleepy. I straightened it up repeatedly, but in the end it still sort of slopes forwards and to one side; it’s alright, it mostly just looks like it’s staring at something much smaller than itself, but I made sure to leave it for about half an hour before I started working on my next project – a big dragon, to which I will return once it’s finished.
[…] I’ve been having great fun lately customising USB sticks (thumb drives, flash drives, whatever you want to call them) using epoxy putty. The putty doesn’t require any baking, and it seems to be hard enough and strong enough to survive in pockets full of keys for long periods without any visible scratching – although it does accumulate smudge marks very quickly, they’re easy to wipe off. […]
Pingback by Oolong’s Zoo » USB Sculptures — 14 March 2008 @ 20:15
I’m only used to putties. We have a very good one in South Africa called Meta-putty. It is far cheaper than Milliput, last time I paid R30 p/kg. (£2). I’m going to buy some Sylmasta tomorrow. From the picture it looks like the same stuff, or at least I hope so. The stuff I used has a very distinct smell, sets as hard as anything on earth. I once made a mistake on an eagle I was making and literally had to use a hammer and chisel to break of the wrong head, without causing damage to the rest of the bird. It is also its own glue and the new head simply stuck on.
Caution: always sculpt on a plastic sheet, maybe even smear with Vaseline, if it dries on the table, it stays on the table – forever…No need for gloves, but wash your hands before eating, smoking, answering the phone etc…
I have been looking for something to sculpt with here for a long time, thanks for the Sylmasta tip…
Comment by Wessels — 2 June 2008 @ 22:38
PS: Great for painting too, takes oils, acrylics…
Comment by Wessels — 2 June 2008 @ 22:43
[…] Oolong's Zoo » Epoxy Putty: First experiments 21 Apr 2007. After the cat I still had lots of putty left over which I needed to use before it set hard, so I set to work making a human face..oolong.co.uk/zoo/epoxy-putty-first-experiments – Oolong's Zoo » Epoxy Putty: First experiments […]
Pingback by Web site of the state - State web - State nj web site — 21 August 2010 @ 11:56
Good Day
Above in para 2 you mentioned “Meta-putty” from South Africa. If possible I would like to know the supplier thereof to buy some of it for my art students.
I will appreciate it if you can e-mail me the contacts of the supplier/manufacturer. My e-mail is frik@dekor2000.co.za
Thanks
Appreciate
Frik Nagel
Comment by Frik Nagel — 3 December 2010 @ 08:16
[…] first attempt just involved drilling a hole and mounting a bare, topless bolt in it using epoxy putty. This turned out to be a mistake – the mounting needs to be strong enough to withstand […]
Pingback by Oolong's Zoo » Monopod staff — 19 January 2011 @ 10:13